
Help Center
카페24 소식

[스마트디자인] 주문서 추가항목 쇼핑몰 프론트 적용 안내
2014-04-10
안녕하세요, 카페24 운영도우미 입니다.
주문서 추가항목을 쇼핑몰에 적용하는 방법을 안내해 드립니다.
자세한 내용은 아래를 참조해 주세요.
■ 업데이트 내용
주문서 작성시 추가로 입력 가능한 '주문서 추가항목'을 쇼핑몰에 적용하려면
아래의 안내에 따라 HTML 소스를 수정해주시면 됩니다.
※ 주문서 추가항목 설정 위치 : 상점관리 > 운영관리 > 주문서 추가항목 관리
1. PG쇼핑몰 수정
- 위치 : 디자인관리 > 디자인편집하기 > 전체화면보기 > 주문(order) > 주문서작성(orderform.html)
- 파란색 소스를 추가합니다.
|
... 생략 ... <!-- 해외 배송지 정보 --> <div class="orderArea {$f_r_info_display|display}"> <h3>해외 배송지 정보</h3> <div class="boardWrite"> ... 생략 ... </div> </div> <!-- //해외 배송지 정보 -->
<!-- 추가 정보 --> <div class="orderArea {$ordadd.display|display}"> <div class="titleArea"> <h3>추가 정보</h3> </div> <div class="boardWrite"> <table border="1" summary=""> <caption>추가 정보 입력</caption> <tbody module="Order_ordadd"> <tr> <th scope="row">{$subject}</th> <td>{$html}{$content}</td> </tr> <tr> <th scope="row">{$subject}</th> <td>{$html}{$content}</td> </tr> </tbody> </table> </div> ... 생략 ... |
- 위치 : 디자인관리 > 디자인편집하기 > 전체화면보기 > 주문(order) > 주문완료(order_result.html)
- 파란색 소스를 추가합니다.
|
... 생략 ... <div class="orderArea"> <h3>배송지정보</h3> <div class="boardView"> ... 생략 ... </div> </div>
<!-- 추가 정보 --> <div class="orderArea {$ordadd.display|display}"> <div class="titleArea"> <h3>추가 정보</h3> </div> <div class="boardView"> <table border="1" summary=""> <caption>추가 정보</caption> <tbody module="Order_ordadd"> <tr> <th scope="row">{$title}</th> <td>{$content}</td> </tr> <tr> <th scope="row">{$title}</th> <td>{$content}</td> </tr> </tbody> </table> </div> </div> ... 생략 ... |
- 위치 : 디자인관리 > 디자인편집하기 > 전체화면보기 > 주문(order) > 주문상세(/myshop/order/detail.html)
- 파란색 소스를 추가합니다.
|
... 생략 ... <div class="orderArea"> <h3>배송지정보</h3> <div class="boardView"> ... 생략 ... </div> </div>
<!-- 추가 정보 --> <div class="orderArea {$ordadd.display|display}"> <div class="titleArea"> <h3>추가 정보</h3> </div> <div class="boardView"> <table border="1" summary=""> <caption>추가 정보</caption> <tbody module="Myshop_ordadd"> <tr> <th scope="row">{$title}</th> <td>{$content}</td> </tr> <tr> <th scope="row">{$title}</th> <td>{$content}</td> </tr> </tbody> </table> </div> </div> ... 생략 ... |
2. 모바일 쇼핑몰 수정
- 위치 : 디자인관리 > 디자인편집하기 > 전체화면보기 > 주문(order) > 주문서작성(orderform.html)
- 배송지정보 하단에 파란색 소스를 추가합니다.
|
... 생략 ... <!-- 해외 배송지 정보 --> <div class="boardWrite {$f_r_info_display|display}"> ... 생략 ... </div> <!-- 추가 정보 --> <div class="{$ordadd.display|display}"> <div class="titleArea"> <h2>추가 정보</h2> </div> <div class="boardWrite"> <table border="1" summary=""> <caption>추가 정보</caption> <colgroup> <col style="width:105px" /> <col style="width:auto" /> </colgroup> <tbody module="Order_ordadd"> <tr> <th scope="row">{$subject}</th> <td>{$html}{$content}</td> </tr> <tr> <th scope="row">{$subject}</th> <td>{$html}{$content}</td> </tr> </tbody> </table> </div> </div> ... 생략 ... |
- 위치 : 디자인관리 > 디자인편집하기 > 전체화면보기 > 주문(order) > 주문서완료(order_result.html)
- 배송지정보 하단에 파란색 소스를 추가합니다.
|
... 생략 ... <!-- 배송지 정보 --> <div class="titleArea"> <h2>배송지 정보</h2> </div> <div class="boardView"> ... 생략 ... </div> <!-- 추가 정보 --> <div class="{$ordadd.display|display}"> <div class="titleArea"> <h2>추가 정보</h2> </div> <div class="boardView"> <table border="1" summary=""> <caption>추가 정보</caption> <colgroup> <col style="width:100px" /> <col style="width:auto" /> </colgroup> <tbody module="Order_ordadd"> <tr> <th scope="row">{$title}</th> <td>{$content}</td> </tr> <tr> <th scope="row">{$title}</th> <td>{$content}</td> </tr> </tbody> </table> </div> </div> ... 생략 ... |
- 위치 : 디자인관리 > 디자인편집하기 > 전체화면보기 > 마이쇼핑(myshop) > 나의 주문내역(order) > 주문상세(order/detail.html)
- 관련링크 하단에 파란색 소스를 추가합니다.
|
... 생략 ... <!-- 최종 결제 정보 --> <div class="{$final_payed_display|display}"> <div class="titleArea"> <h2>최종 결제 정보</h2> </div> <div class="boardView"> ... 생략 ... </div> </div> <!-- 관련 링크--> <ul class="addition {$addition_display|display}"> ... 생략 ... </ul> <!-- 추가 정보 --> <div class="{$ordadd.display|display}"> <div class="titleArea"> <h2>추가 정보</h2> </div> <div class="boardView"> <table border="1" summary=""> <caption>추가 정보</caption> <colgroup> <col style="width:100px" /> <col style="width:auto" /> </colgroup> <tbody module="Myshop_ordadd"> <tr> <th scope="row">{$title}</th> <td>{$content}</td> </tr> <tr> <th scope="row">{$title}</th> <td>{$content}</td> </tr> </tbody> </table> </div> </div> ... 생략 ... |
주의사항 : 쇼핑몰 생성 날짜에 따라 HTML을 다르게 적용 해야 하는 경우도 있으니 위와 같이 설정 후 화면에 제대로 나오지 않는다면 파란색 소스중 일부 내용을 아래의 예시 처럼 수정 해주시기 바랍니다.
|
수정 전 |
수정 후 |
|
<div class="titleArea"> |
<div class="mTitle"> |
|
<div class="boardView"> |
<div class="mBoard rowType1"> |
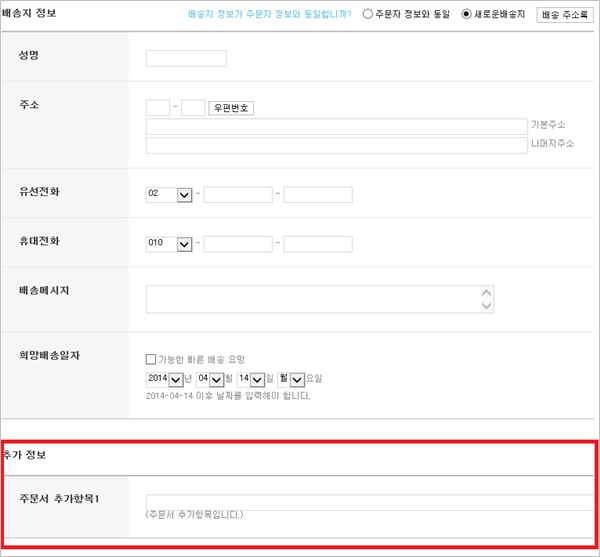
※ 주문서 추가항목 쇼핑몰 프론트 적용 화면
▼ 주문서 작성 화면
▼ 주문완료 화면

카페24 는 쇼핑몰 운영을 보다 편리하고 쉽게 할 수 있도록 기능 업데이트를 지속적으로 진행하고 있습니다.
더 좋은 서비스가 되기 위해 노력하겠습니다. 끊임없는 애정과 관심 부탁 드립니다.
궁금하신 사항은 언제든지 고객지원센터 1:1게시판으로 문의해주세요. [문의하기]